SSL offloading relieves a Web server of the processing burden of encrypting and/or decrypting traffic sent via SSL, the security protocol that is implemented in every Web browser. The processing is offloaded to a separate device designed specifically to perform SSL acceleration or SSL termination.
BIG-IP Local Traffic Manager with the SSL Acceleration Feature Module performs SSL offloading.
Introduction
The BigIP F5 provide 2 ways in which SSL is processed. These are :
Client SSL – F5 decrypts the encrypted traffic inbound from the client.
Server SSL – Traffic is re-encrypted by the F5 then routed onto the backend servers.
Server SSL – Traffic is re-encrypted by the F5 then routed onto the backend servers.
There are a number of advantages to SSL termination on the F5, which are :
- Allows iRules processing and cookie persistence.
- SSL Traffic offload from web servers
- SSL key exchange and bulk encryption is performed by a single piece of BigIP F5 hardware rather then needing (to install) additional hardware in each webserver.
- Centralized certificate management
Why SSL Offloading is required ?
Any web server is capable of handling SSL traffic but how efficiently they can handle is a question. Web Servers are built to serve pages quickly, if they start handling SSL traffic they tend to loose their efficiency.
On an average 8 to 12 times web servers perform slower when they handle SSL traffic. So it is better advised to have SSL offloading done using dedicated hardware(in this case its Big-IP F5-LTM) and use web servers to serve http traffic.
Why BIg-IP ?
In my experience I’ve used 3 different make of appliances and I strongly recommend using Big-IP for this purpose. They are damn good in doing this effectively.
How to ?
This article believes that you have F5-LTM setup done and is ready to use.
Prerequisites:
1. We need SSL Cert for the domain you are trying to do SSL offloading @ F5 end.
Steps: For v10.*
1. Login to F5-LTM using administrator privileges
2. From Left side menu “Local Traffic” select SSL Certificates
3. This will list <List of all certs that are currently installed or available on this LTM for use
2. From Left side menu “Local Traffic” select SSL Certificates
3. This will list <List of all certs that are currently installed or available on this LTM for use
4.Steps to Install/Add new Cert to LTM appliance:
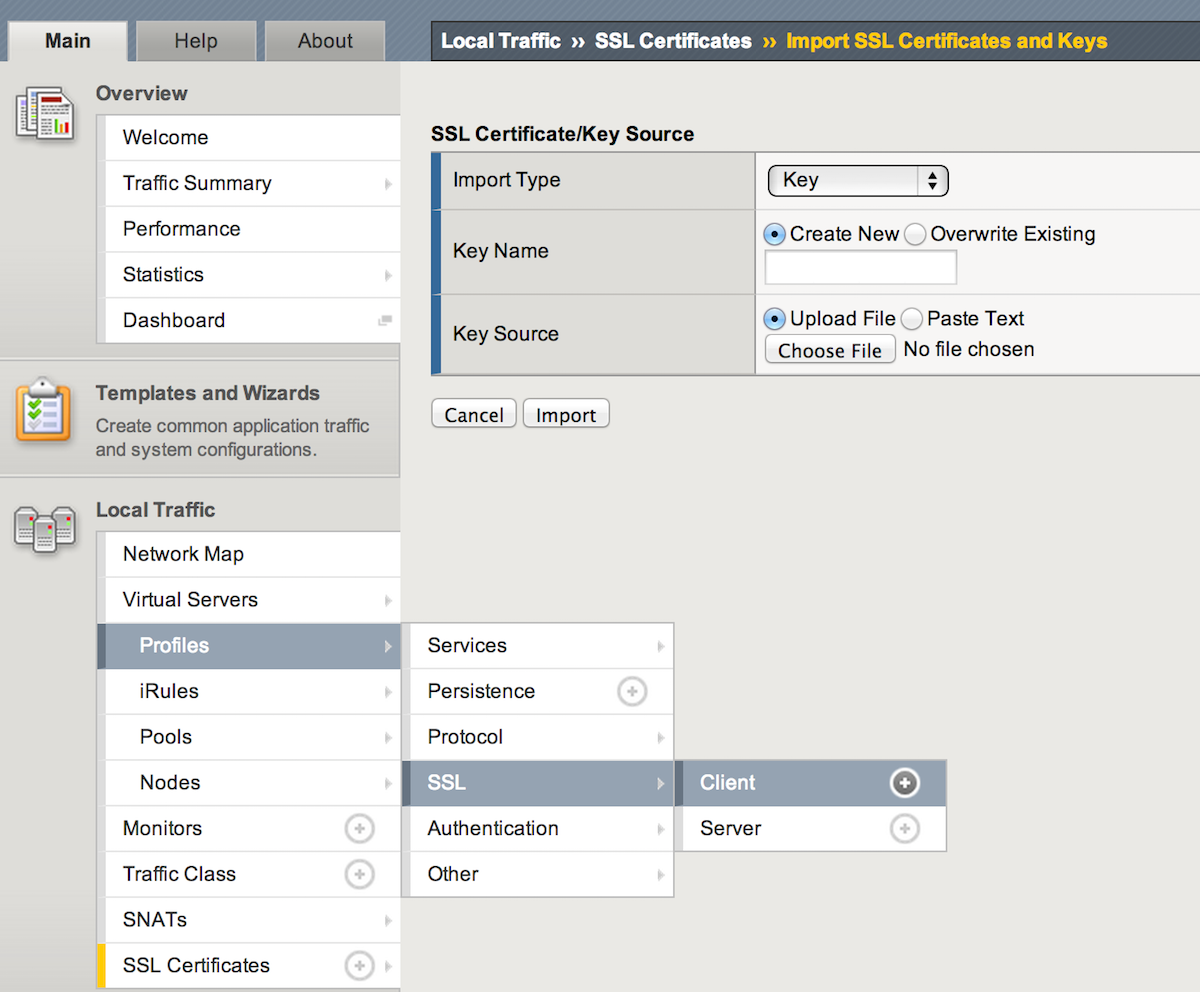
a. On upper right corner you can see an option “Import” select the same to import new certs
b. From the listed menu(for import) choose, Certificate and Provide Name for the cert and upload the cert
using the upload option
c. From the listed menu(for import) choose, keys and provide name for the key, upload the key using the
upload button.
d. Now your new certs are ready for use.
b. From the listed menu(for import) choose, Certificate and Provide Name for the cert and upload the cert
using the upload option
c. From the listed menu(for import) choose, keys and provide name for the key, upload the key using the
upload button.
d. Now your new certs are ready for use.

5. Now we have to create client profile using the certs uploaded to LTM
6. Under “Local Traffic” >> Profiles >> SSL >> you can see 2 options client and server. select/choose Client option
7. A page opens up with list of available client profiles( 2 profiles will be listed by default [client ssl and client-insecure-compatible])
8. Click “Create” button at the right top of the page to create new Profile.
a. Name the Profile
b. By default Parent Profile is selected as clientssl, do not change it.
c. Right side of the screen, just on top of next frame select an option called as Custom.
d. This will enable you to select certfile and key file for this profile.
e. Make sure that you use right cert and its corresponding key
f. click update to save profile.

9. Now we are all set to create new Virtual Server to offload SSL
10. Steps to create Pool
a. Select “Pools” under Local Traffic
b. This will list available pools on this appliance
c. Select “Create” option from right corner of the page to create a new pool
d. Fill in details as below
Name : Name of the pool (usually name it in align with the application)
Health Monitors : select http
Resources
Load Balancing Method : Leave default (Round Robin)
Priority Group : Leave disabled
New Members : Address : Type in IP address of the Web Server
: Service Port : 80
Click add to add this member to the pool, repeat step d to add multiple pool members.
e. Click Finished to create the pool.

11. Steps to create Virtual Server
a. Select “Virtual Servers” under Local Traffic
b. This will list all available Virtual Servers, click create button seen on top right corner to create a new Virtual Server.
c. Fill in Name: with Virtual Server Name
d. Fill in Destination with the IP address on which this Virtual Server will listen
e. Fill in Service Port with 443 (as we want to offload SSL)
f. Leave rest of all options as it is except the following
g. Select HTTP Prrofile as ‘http’
h. Select SSL Profile (Client) as “Name of the profile you created in step 8″
i. Select Default Pool as “Name of the Pool you created in Step 10″
j. All set, click update to create Virtual host.

Make sure that you have DNS parked for the Virtual Server IP you have choosen, this is needed to avoid Cert errors.
All good, now F5-LTM will handle SSL Termination and your webserver will handle only HTTP.

No comments:
Post a Comment